Secret Santa!

Hello everyone!!


I have something special for you today. To be honest on this project I worked for 5 days. Every day for at least 2 hours but it was worth it. I adore final result. I can not definitely call this a card although it has a look and function like a card. Measures are 25X15 cm.


Let’s look at what I was creating….


Christmas2.jpg


I wanted to create the front part of the house with a roof, on the roof I wanted to have Santa’s sled and deer, I wanted to have night sky behind. And in the end I wanted to have the opportunity to peek into the interior of the house. Complicated?? Yes, it is but I am sure but no one has done anything like that.


So let’s start from the beginning..

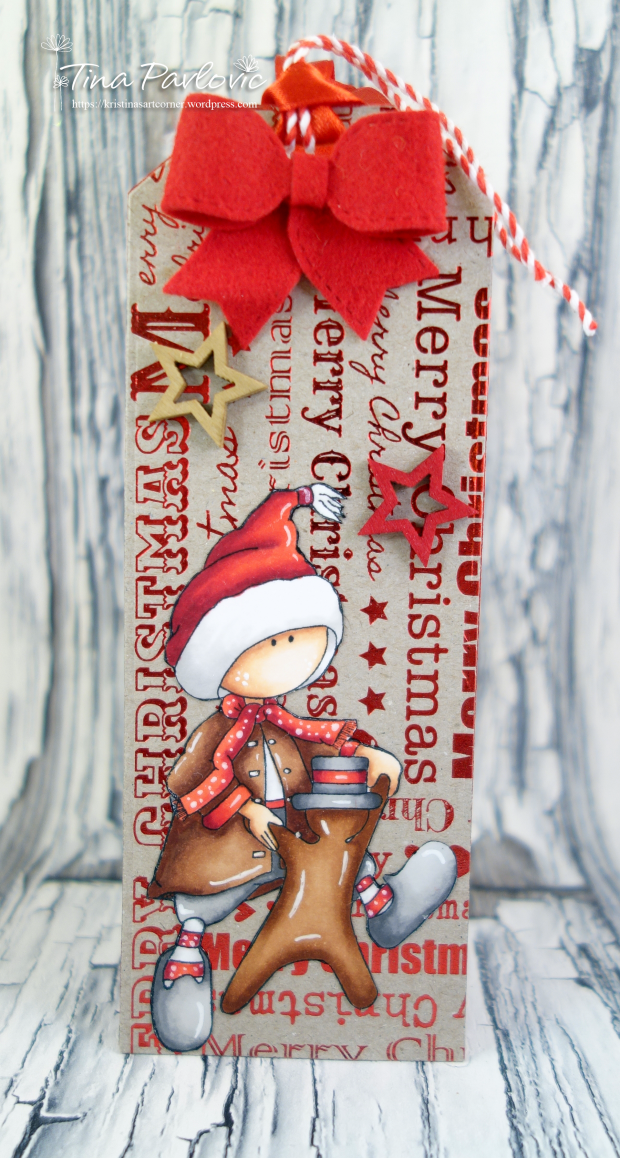
 I stamped all images with Copic friendly black ink and colored my images with my Copics. After that I die cut everything with matching dies. I added highligts with white gel pen.


Christmas4.jpg


I applied Broken China, Faded Jeans and Black Soot for my night sky with mini ink blending tool and added some snow on the top with Copic Opaque White. I used Copic Opaque White for everything outside like roof, images, the front of the house, windows…  On the top of the roof I added my images from Santa and Friends stamps set.


roof.jpg


For the roof and for the chimney I made score lines with ScoreBuddy to remind of the rooffing tiles and bricks. I colored panels with copic markers and added snow with Copic Opaque white again. on the top of the roof and chimney I applied some Nuvo Deluxe Adhesive and Diamond dust on the top of the glue. I attached roof with Foam tape but the top of the roof have just two layers and the bootom of the roof have 5 layers.


Christmas 3.jpg


For the front of the house I used Small Brick Wall stencil and applied Pumice Stone. After that I die cut two windows with Classic Window Die-namics from Neenah Soler White and I colored with Copics . I used acetate for glass and velum for curtains. I also mede small decorations for the windows using Filled with Joy and Perfect Poinsettia die-namics.


Christmas5.jpg


The panel opens with the help of magnetic sheets ( we use that sheets for storage). I cut two stripes and added on the back of the card base and one on the back of the flap.

And now.. Inside of the house with all these Beautiful images from BB Secret Santa stamps set. I just adore this stamps set!! My favorite for sure!!

The wallpaper and carpet I made with Kraft Collection Solid Stripes and Itsy Bitsy Polka Dots paper pack. For my Fireplace I stamped first Marble Background with Grout Gray Premium die ink and die cut all pieces with Fireplace Die-namics. For the wood in the fireplace I used Wood Weneer sheets. I attached my images with Score tape, Foam tape or some of them with Nuvo Deluxe Athesive.


christmas.jpg


I hope you like it!!

Until next time!

Kristina


I would like to take part in the following challenges:

1.Creatalicious Challenge- Anything Goes

https://creataliciouschallenges.blogspot.com/


2.Word Art Wednesday Challenge  #358/ #359- Anything Goes

http://wordartwednesday.blogspot.com/


3.Simon Says Stamp Monday Challenge- Take Flight

Home


MFT Painted Poppies!!

Hello everyone!


From the first moment I saw Painted Poppies stamps set I fell in love and finally I got it in my last order from MFT. Beautiful stamps set. Amazing for coloring and practicing. I have chosen a bit unusual combination for poppies this time.


Makovi.png


For my background I used Romantic script Background stamps set and stamped with Pure Plum Premium dye ink. I added some black dots. For card base I used MFT Black Licorice cardstock.


I stamped flowers with Cement Gray Premium dye ink and colored with my Copic Markers RV63, RV66 and RV69. Leaves and stems I stamped with Sour Apple Premium Dye in and colored with G07 and G14. When coloring was done I stamped centrum of each flower with Extreme black ink and for this technique I used misti because I left all stamps on the same positions. I also added some white highlights on my coloring.


I stamped sentiment on strip from Blueprints 27 with VersaMark clear ink and Embossed with Detail White Embossing powder. Sentiment is from Anything-But- Basic Friendship stamps set.


Some of the images I added on the backgroung with Nuvo Deluxe athesive and some with Foam tape.


Until next time!

Kristina


I would like to take part in the following challenges:

1.Creatalicious Challenge- Anything Goes

https://creataliciouschallenges.blogspot.com/


2.Word Art Wednesday Challenge  #358/ #359- Anything Goes

http://wordartwednesday.blogspot.com/


My Cross-Stitch Patterns with MFT Products!

Hello everyone!!


I am here again with my latest two Stitched Project. Like always I used MFT products.  It is very important to say that I have created these cross-stitch patterns. You can copy  if you want but I ask you to tag me on social media. @pavlovic3978 or FB Tina Pavlovic!


joy mft.png


I die cut two times Cross-Stitch Bookmark on blue cardstock and after that I die cut panel with A2 Stitch Ractangle Stax Set 1. I used White and Blue embroidery threads and stitched this pattern. From white card stock I die cut the deer with Dear Love Die-namics  and sentiment with Joy Die-namics. For Rudolph’s nose I used small dots colored with red Copic marker.


it's cold outside.png


For my second card I die cut again two times with Cross-Stitch Bookmark die-namics but this time on White cardstock. I Used A2 Stitched Rectangle Stax Set 1 to die cut the panel. For my mitten I used two embroidery threads  light pink and turquoise. For my Sentiment Baby It’s Cold Outside I used BB Alphabet & Numbers Die-namics. Pom poms are from my stash.


I hope you like it!

Until next Time !

Kristina

Perfect Poinsettia by MFT!

Hello my crafty friends!!


For today’s post I decided to share with you project with new MFT products. More precisely the project I created with new Perfect Poinsettia die-namics and Christmas Background stamps.


Bozicna ruza.png


I die cut piece of Bristol cardstock with Blueprints 27 and stamped new Christimas Backgorund stamp with VersaMark clear ink and embossed with Ranger Red embossing powder. After that I applied Barn Door Distress ink with mini ink blending tool.


Bozicna ruza 2.png


With Perfect Poinsettia Die-namcis and Bristol cardstock I die cut all pieces. For my watercoloring I used Crushed Olive, Peeled Paint, Mowed Lawn, Abandoned Coral, Barn Door, Aged Mahogany, Fossilized Amber and Spice Marmalade distress inks. I also applied with my brush small dots with Peeled Paint and Aged Mahogany distress inks and with Copic Opaque White.


With my bone folder I twisted all petals and leaves for a better dimension. And yes PPP celar droplets 4 & 6 mm was amazing finished touch for this card.


I hope you like ti!

Until next time..

Kristina


I would like to take part in the following challenges:

1.MFT Card Challenge -Sketch #407

http://www.cardchallenges.com/2018/10/wednesday-sketch-challenge-sketch-407.html


MFT_WSC_407


2.As You Like It Challenge- CAS or Fussy and Fancy and Why

(I am somewhere between CAS and Fussy style. I do not love to much embelishments on my cards but I love cards with layers with die Cuts, stamped images and patterned paper.)

http://asyoulikeitchallenge.blogspot.com/


3.Word Art Wednesday Challenge  #356/ #357- Anything Goes

http://wordartwednesday.blogspot.com/


4.Time Out Challenge -Colourful

http://timeoutchallenges.blogspot.com/


5.Double D Challenge – Stripes and Dots

http://daranddiane.blogspot.com/


6.Allsorts Challenge- Traditional Christmas Colors

http://allsortschallenge.blogspot.com/


7.Creatalicious Challenge- Anything Goes

https://creataliciouschallenges.blogspot.com/

You’re My Favorite Human!

Hello everyone!!!


I am here again with new project!! I have to admit that it was a pleasure to create something like this. Monster- Rainbow card!!! Come on!!!  I imagined that monsters screaming aaaaaaa heeeeeeeeeeeey and then they spinning around. hahaha! I told you, So Funny!!!!


MONSTER.png


I stamped all my monsters from MFT More Monster stamps set and die cut with coordinating dies. For stamping I used MFT Premium dye inks : Limelight+ Dill Pickle,  Sunshine+ Daffodile,  Orange Zest+ Tangy Orange, Blue Breeze+ Cornflower,  Tickled Pink+ Razzle Berry.


MONSTER 1.png

For my spinning part I used Blueprints 6 Tag Builder by MFT and Jumbo Peek-a- Boo Circle Widow Die-namics. The panel is die cut with A2 Stitched Rectangle Stax set 1. And word SPIN is from Interactive Labels stamps set.

I also used My Favorite Things Card stock Tickled Pink, Limelight, Lush Lagoon, Daffodil and Orange Zest.

Highlights I added with White gel pen and On the top of the Hearts I added some Wink Of Stella Clear Glitter pen.


MONSTER 3.png


I stamped sentiment with VersaMark Clear ink and embossed with Detail White Embossing Powder. And yes, of course I added Googly Eyes on monster with the sentiment.


I would like to take part in the following challenges:

1.MFT Card Challenge -Sketch #407

http://www.cardchallenges.com/2018/10/wednesday-sketch-challenge-sketch-407.html

MFT_WSC_407


2.Simon Says Stamp Work It Wednesday Challenge – Favorite Stamping Technique

Work It Wednesday August/September 2018: Celebrating Stamping & STAMPtember®!


Until next time!!

Kristina


Joy!!

Hello again!

This is my second post for Vilda stamps today. This time I made Christmas card using Minitomtar  (Mini Santas) stamps set from Vilda Stamps.


VILDA S. OCT.png


I stamped all images on Kraft cardstock with MFT Premium Dye ink Milk Chocolate.
After that I colored only parts with red, white and brown.
I used watercolor pencils or White gel pen.

I die cut panel with MFT stitched Rectangle stax set 1 and added Joy sentiment on the top of the panel.
Joy is die cut with MFT Joy Die-namics.


Until next time!

Kristina


Santa Dancing with Vilda Stamps!

Hello everyone!!


It is time for my DT project with Vilda Stamps products and I decided to use Santa Dancing ( Tomte Dansande) stamp.


VILDA STAMP OCT.png


I stamped image with Copic friendly black ink and colored with my Copic markers, after that I cut it off image with scissors. I also added some highlights with White gel pen.


Next step was to die cut bookmark and for that I used MFT Cross Stitch Bookmark Die-namics but without stitched die from the patterned paper. I also die cut one more from the red cardstock and glued them together. I added my colored image on the top with Scor tape.


For decorations I decided to use MFT Stitch Beautiful Bows Die-namics and die cut the bow from the felt. I also used some ribbon, twine and wood stars from my stash!


Copic Markers: R24, 27, 39, 46   / E000, 00, 13, 21, 23, 25, 27, 29, 34, 35, 37, 39  / C5, 3, 1 +blender.


1.Simon Says Stamp Wednesday Challenge- Anything But a Card

Home


Until next time!

Kristina

Happiness Is A Cup Of Coffee Shared With You!


Good Morning Everyone!!


I am here with new project using My Favorite Things Products.


COFFEE.png


Let’s start with the background. For my background panel I used Wonky Stitched Rectangle Stax die-namics and Plaid Patterns 6×6 paper pad. After that I die cut two cups with Hot Cocoa Cups Die-namics from Bristol Smooth paper and applied Wild Honey and Spiced Marmalade distress oxide inks with mini ink blending tool.

I die cut large and small Marshmallows, topping ,steam and cocoa from Neenah solar White paper and colored with my copic markers. I also die cut Stitched heart from the same paper par and added on the mugs!

The bears come from Friends in the Forest stamps set. I stamped them with copic friendly Extreme black ink and colored with my copics. After that I die cut them with coordinating dies. I also added some highlights with White gel pen.


For my sentiment I used Coffee Break stamps set. I stamped with VersaMark ink and embossed with Detail White embossing powder on strip from the Blueprints 27 Die-namics. With mini ink blending tool I applied the same oxide inks W.Honey and S.Marmalade.

For finished touches I added Nuvo Crystal Drops Gloss: English Mustard and Butter Milk.


Copics:  E21, 23, 25, 27   /  Y15, 17   /YR04    / B91, 93, 95   /  C1, 3 +blender


Until next time!

Kristina

I would like to take part in the following challenges:

1.Simon Says Stamp Work It Wednesday Challenge – Favorite Stamping Technique

Work It Wednesday August/September 2018: Celebrating Stamping & STAMPtember®!


2.Cards Und More challenge – Anything Goes -Autumn inspired

https://cards-und-more-shop.blogspot.com/2018/10/shop-blog-challenge-no-28-anything-goes.html


3.As You Like It Challenge- CAS or Fussy and Fancy and Why

(I am somewhere between CAS and Fussy style. I do not love to much embelishments on my cards but I love cards with layers with die Cuts, stamped images and patterned paper.)

http://asyoulikeitchallenge.blogspot.com/


4.Word Art Wednesday Challenge  #356/ #357- Anything Goes

http://wordartwednesday.blogspot.com/


5.Time Out Challenge -Colourful

http://timeoutchallenges.blogspot.com/


6.Penny Black and More Challenge – Autumn Splendour

http://pennyblackatallsorts.blogspot.com/


7.Addicted to Stamps Challenge – Autumn Colors

http://addicted-to-stamps-challenge.blogspot.com/


8.Love to Scrap Challenge – Fall Back

https://lovetoscrapchallengeblog.blogspot.com/


Words 2 Craft By Challenge!

Hello my dear crafty friends!


It is time for new W2CB challenge :

https://words2craftby.blogspot.com/


This month’s words come to us from Humbert Wolfe:

“Listen!    The wind is rising, and the air is wild with leaves, we have had our summer evenings, now for October eves. ”


And this is how I was inspired:


W2CB OCT.png


I die cut background with MFT Blueprints 27 Die-namcis from adorable Fall Break Carta Bella 6×6 paper pad. After that I just used Echo Park Celebrate Autumn Stickers and Carta Bella Fall Break Chipboards. Belive me it is Amazing Fall Collection! Some of these elements I added on background with Nuvo Deluxe adhesive but for some I used Foam tape. For the card base I used white card stock.


Until next time!

Kristina!


I Love Math Challenge!!

Hello Everyone!!!


This is me again with something new! Have you ever heard  for I Love Math Challenge? This is a challenge organized by my friend Milka Gubo on her blog Crafty Milka!

thumbnail.png


In this challenge, Milka combined two of her gratest passions: Math and Cardmaking! An amazing idea! When Milka asked me if I would be Guest Designer,  I could not say NO. 

The Theme for this challenge is CRESCENT Shape and was chosen by Neha!

So let’s look at what I have created for you today…


I love Math Ch.png


I have to admit that when I heard the theme I immediately had in my mind the idea for this card. What would fit better in this topic than Halloween project??

First I die cut the moon or better said half-moon with two circles dies in different sizes with Sizzix Circles Dies from Bristol Smooth paper. After thad I colored the moon with Mustard Seed and Pumice Stone distress inks.

I stamped image from MFT BB Wich Way is the Candy stamps set with Copic friendly black ink and colored my bat with Copic Markers. I die cut him with matching die. The sentiment from the same stamps set I stamped on MFT Black Licorice cardstock  with VersaMark and embossed with Detail White Embossing powder. I die cut sentiment with MFT Essential Speech Bubbles Die-namics.

For my background I used MFT A2 Stitched Rectangle Stax Set1 and Bristol Smooth paper again but this time I applied Distress Oxide inks on whole surface with mini ink blending tool. I used Wilted Wiolet, Seedles Preserves, Faded Jeans and Black Soot. I applied water with Distress Spayer and added some splashes with Copic Opaque White. Next step was to die cut stars from MFT Silver Sparkle cardstock with MFT Shining Stars Die-namics. For my card base I used Black Licorice cardstock.


Please visit Crafty Milka blog and join us in this challenge!! Create any kind of project using crescent shape on it or make crescent shaped project. Crescent Shape must be in focal point.


Until next time!

Kristina