Wishing You Peace This Holiday!!

Hello!!


Like I promised this morning, here I am back with another project for Vilda Stamps blog. This time I used Christmas tree with stars (Gran med stjärnor) stamps set.


vilda stamps wishing you peace.jpg


First I die cut front panel from Neenah Soler White carstock using MFT A2 Stitched Rectangle Stax Set 1. After that I stamped Christmas Tree with MFT Jellybean Green Premium Dye ink. After that I added snowy hills using Copic Markers BG10 and BG11. With small Blending brush I added some Tumbled Glass distress ink on the sky. I also used White gel pen to add snowflakes on background.


I decided to decorate my tree with some bling in several colors from my stash and yellow star for the top of the tree. For the patterned paper in the backgrund I used Celebrate Christmas paper pack from Echo Park.


Sentiment is from Dashing Deer stamps set and I stamped on  front panel with MFT Extreme Black ink.


Thank you for stopping by!

Kristina

Sweet Winter Wishes with Vilda Stamps!!

Hello my dear friends!!!


It is time for my DT Projects for Vilda Stamps blog. For now I have one card but a little later today I will present you another project using Vilda Stamps Products.


vilda stamps sweet winter wishes.jpg


For this card I used Vilda Stamps Big Gingerbread House (Stort Pepparkakshus) stamps set. I stamped image with Extreme Black ink by MFT and colored with my Copic Markers.

E000, E00, E13, E21, E23, E25, E27, E29   /  R27, R39, R46  /  YG05, YG07  /  G07  /  YR15  /  Y19, Y08  /  B63, B69, B91, B93, B95  /  BG11, BG13, BG18  /  V22, V25, V28  / C1+blender


When coloring was finished I die cut panel with MFT Wonky Stitched Rectangle Stax and using Blend brush I applied Tumbled Glass Distress ink on the edges. I also added some highligts on image using White gel pen and added Nuvo Glitter Accents- Fresh Snowfall.


For the background I used Celebrate Winter paper pack from Echo Park and Element Sticker from the same collection for snowflakes on the front panel.

Sentiment is from MFT Snow Globe Sentiments  stamps set and sentiment strips I die cut using MFT Blueprints 28 Die-namics.


Until next time!

Kristina.

I would like to take  part in the following challenges:

1.Addicted To stamps Challenge- Anything Goes

https://addicted-to-stamps-challenge.blogspot.com/


2.Word Art Wednesday Challenge #414-415

http://wordartwednesday.blogspot.com/


3.Simon Says Stamp Wednesday Challenge- Anything Goes

Home

Paper Smooches Challenge-Design Team Call!!

Hello Everyone!!!


I decided to participate with today’s project in Paper Smooches Challenge -Design Team Call- Anything Goes.


0 PS challenge design team call


In previous years I really enjoyed using PS Products and I have the honor to say that I also was Guest Designer For Paper Smooches. Projects from that period you can find down below!!


And now a little more about today’s project!!!!


paper smooches dt 2.jpg


For background on this card I used Echo Park Celebrate Christmas Paper pack and Blueprints 27. After that I used Paper Smooches Notebook Scallop die and Kraft cardstock. On that die cut I decided to create a wreath using Paper Smooches Lattice and PS Leaves 1 dies. I die cut all parts for the wreath from the same patterned EP paper pack and Gold Mirror cardstock. I also die cut 4 snowflakes and number 25 wich represents Dec.25 from Mirror cardstock. I also used some Crystals from my stash!


And now some of my earlier projects using Paper Smooches products:


oktobar-17-4septembar-10-6


Paper Smooches Challenge-Design Team Call

https://papersmooches.blogspot.com/2019/11/paper-smooches-challenge-design-team.html


Vilda Stamps Project And DT Call

Hello everyone!!


Did you know that Vilda Stamps has DT Call? DT Call is for both International and National crafters. Design Team member term is January- December 2020. More information you can find here:

Vilda Stamps DT Call


And this is what I created using Vilda Stamps Santa and Mouse (Tomten och Musen)stamps set.


ho ho ho Vilda.jpg


I stamped image from Santa and Mouse stamps set with Extreme black ink on Neenah Sooler White cardstock and colored with my Copic Markers.

CM:E000, E00, E13, E21 /  E33, E34, E37 /  R14, R20, R21, R27, R39, R46  /  Y19  /  G07,YG05, YG06, YG07  /  C1, C3, C5, C7 +blender

When coloring was finished I added highlights with White gel pen and Stamped sentiment Ho Ho Ho from Sassy Santa Stamps set- MFT. After that I die cut circle using Sizzix Circle Dies. I also die cut larger circle from Kraft card stock using the same dies set.

For the background on this card I used Doodlebug Design Christmas Town paper pack and Rosie’s Studio Diamond Stickers.


I would like to take  part in the following challenges:

1.Love To Scarp Challenge- Anything Goes

https://lovetoscrapchallengeblog.blogspot.com/


2.Addicted To stamps Challenge- Anything Goes

https://addicted-to-stamps-challenge.blogspot.com/


3.Word Art Wednesday Challenge #412-413

http://wordartwednesday.blogspot.com/


4.Addicted To Stamps And More Challenge- Make Your Mark

http://addictedtostamps-challenge.blogspot.com/


5.Time Out Challenge #148

http://timeoutchallenges.blogspot.com/


6.Penny Black and More Challenge- Christmas

http://pennyblackatallsorts.blogspot.com/


Merry Kissmas with Coca Cola Lip Balm!!

Hello my dear crafty friends!!


For today I have something special for you. During our trip I found some interesting things and one of them is Coca Cola lip balm. I also found Sprite and Coca Cola Vanilla!! You may have seen it before but I was surprised positively. And yes, They are perfectly sized for MFT Lip Balm pouch. Yuhuhuhuh!


coca cole lip.jpg


For my panel I used Rosie’s Studio patterned paper an MFT A2 Stitched Rectangle Stax set 1. On this panel with MFT Lip Balm Window and Frame Die-namics I made oppening for coordinating pouch.

The Bear is from MFT Friends In The Forest stamps set and I stamped image with Gout Gray Premium Dye ink and colored with my Copic Markers. I used C1, C3 +blender  /  R14, R20, R21, R22, R27, R46. I also added some details on my coloring with White and Black gel pen. When coloring was finished I cut image out with coordinating die.

With MFT Mountain High Die-namics I die cut from white cardstock two hills and 4 trees but before I added images I decided to do embossing on my panel. I stamped sentiment from Sending Smooches stamps set and one tree from Friends In The Forest stamps set with VersaMark and Embossed with White detail embossing powder.

Important to note that I used Essential Sentiment Rip Strips inside of the card. On this way the recipient can take lip balm without destroying the entire card.


coca cole lip2.jpg


I hoppe you like it!!

Kristina


I would like to take part in the following challenges:


1.Bastel Traum Challenge- Winter/Christmas

https://bastel-traum.blogspot.com/


2.Addicted To stamps Challenge- Anything Goes

https://addicted-to-stamps-challenge.blogspot.com/


3.Love To Scarp Challenge- Anything Goes

https://lovetoscrapchallengeblog.blogspot.com/


4.Word Art Wednesday Challenge #412-413

http://wordartwednesday.blogspot.com/


5.Addicted To Stamps And More Challenge- Make Your Mark

http://addictedtostamps-challenge.blogspot.com/


6.Time Out Challenge #148

http://timeoutchallenges.blogspot.com/

Time Out Challenge 148.png


7.Penny Black and More Challenge- Christmas

http://pennyblackatallsorts.blogspot.com/


Kitschy Kitchen and You Bake Me Happy!!!


Hello everyone!!!


I am here again and I want to share with you two projects I created for Copic Marker Sweden Design Team.


For both Projects I used MFT Kitschy Kitchen (Images) and You Bake Me Happy (sentiment) Stamps set. On both Projects I wanted to show how to add coloring details on solid stamped images with Copic Markers.


life is short.jpg


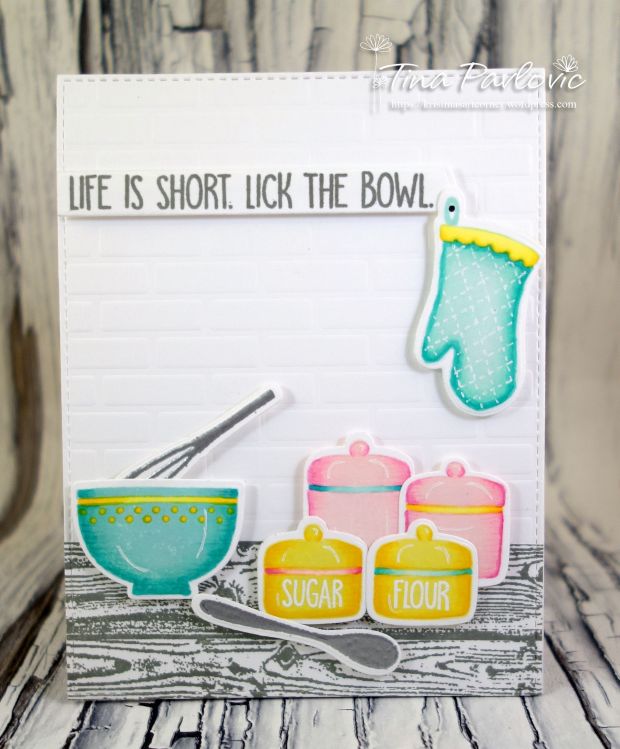
Fot the first card I embossed background with MFT Small Brick Stencil using Embossing pad and my Sizzix big shot. After that I die cut panel with MFT A2 Stitched Rectangle Stax set 1. For the bottom on my card that represent the work surface in the kitchen  I used Wood Plank Background stamps and Gravel Gray Premium Dye ink. With the same ink I stamped sentiment on Slanted Sentiment Strip By MFT too.


I stamped images with different shade of inks (MFT Premium Dye inks) and used Coordinating Copic to add details.

List of inks: Pink Lemonade, Banana Split, Sno Cone

Copics: RV00, RV02, RV04   /   Y04, Y06, Y08  /   BG10, BG11, BG13, BG15

I also used White gel pen for highlights on my images.

I also embossed Words Sugar and Flour using VersaMark ink and Stampendous White Detail Embossing powder and Tsukineko Silver embossing powder for the baking tools.


you are the sugar.jpg


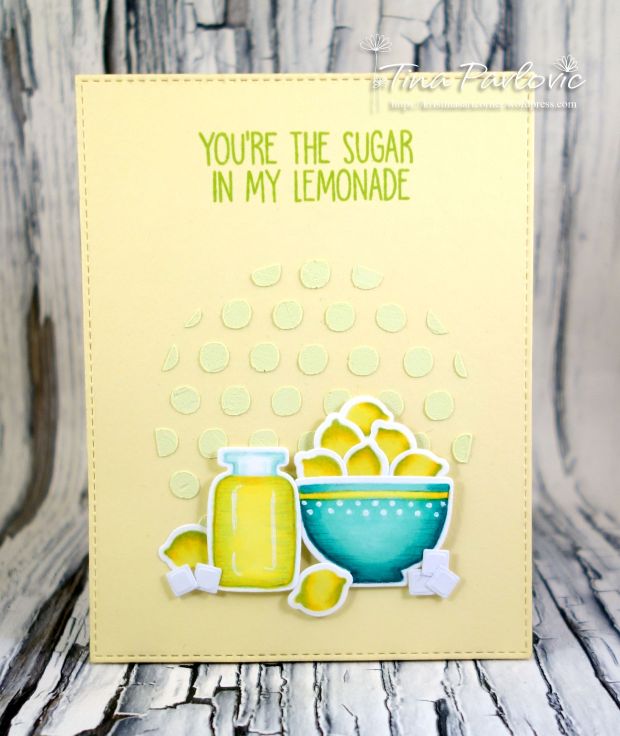
For the second card I used Lemon Chiffon card stock and I die cut panel with MFT A2 Stitched Rectangle Stax set 1 die-namics. After that I die cut circle with Sizzix Circle die from masking paper and used negative cut. I also used Dot Stencil and mixed texture paste with Twisted Citron Oxide ink.

I stamped images with Banana Split, Sno Cone and Berrylicious Premium dye inks and added details with Coordinating Copic Markers: BG01+blender for the glass /  BG10, BG11, BG13, BG15, BG18-bowl  /   G12+ Y04, Y06, Y08 for lemons.

I also die cut a few cubes of sugar with MFT Tea Party Die-namics.

Sentiment is stamped with Limelight Dye ink.


And that is it for today.

Kristina!


1.MFT Sketch Challenge #463  (Second card)

https://mftstamps.com/blogs/news/wsc463


MFT_WSC_463_large


Sunflower Season With Stamp Simply!

Hello everyone!!!


I am here after a long time! The travel season is over and now I have more time for my hobby!! Today’s card was finished before my trip but I did not have time to publish it!!


This stamps set and coordinating dies I got from Stamp Simply as a prize for winning one challenge. Beautiful set! I am very pleased!!


sunflower seson.jpg

First I stamped images with light gray ink on Neenah cardstock and colored with my Copic markers. I used YG05, G07, G14, G20, G21, G24  /  Y13, Y15, Y17, YR04  /  E23, E25, E27, E29. When coloring was finished I added some details with White and black gel pen and die cut image with coordinating die.


For the background panel I used Same cardstock and die cut with MFT A2 Stitched Rectangle Stax set 1. I stamped the same image several times with Grout Gray Premium dye ink and on the top with foam tape I added colored image. I also stamped sentiment on the front panel using stamp from the set and Extreme Black ink from MFT.


For the patterned paper on my card base I used Perfectly Plaid Fall paper pack from Lawn Fawn.


sunflower season2.jpg


I also decided to decorate inside of the card. I stamped sunflower with the same gray ink. Sunflower Season sentiment I stamped with Daffodil and Orange Zest Premium dye inks to get ombre look and after that I die cut with matching die from the set.


I hope you like it!!


Until next time!

Kristina


Challenges:


1.Cupcake inspirations challenge #482

http://cupcakeinspirations.blogspot.com/


cic482.jpg


2.Simon Says Stamp Work It Wednesday Challenge- Fall Inspired Project

Home


3.Word Art Wednesday Challenge #412-413

http://wordartwednesday.blogspot.com/


4.Addicted To Stamp Challenge- Anything Goes

https://addicted-to-stamps-challenge.blogspot.com/


5.Love To Scrap Challenge- Anything Goes

https://lovetoscrapchallengeblog.blogspot.com/


6.Double D Challenge- Neutral Fall

http://daranddiane.blogspot.com/


ca dd fall mb.jpg


7.Addicted To Stamps and More Challenge- Anything Goes

http://addictedtostamps-challenge.blogspot.com/